Interior Design 101: Decorating Tips for Beginners

So you didn’t go to school for interior design? No big deal; you can still transform your home into a designer-worthy space using just a few simple tips. These handy tricks will show you how to inject a stylish, inspiring look into any room in your home.

  1. Use symmetry. If you’re unsure of how to arrange the furniture in a room or hang frames on a wall, simply keep the idea of symmetry in mind. Symmetrical rooms are more pleasing to the eye, so try adding two sofas facing one another to help balance your living room.
  2. Consider the scale. Be sure to choose furniture in a size that fits your specific room. Choose large, overstuffed items for more open rooms and compact, apartment-sized furniture in smaller spaces.
  3. Choose a focal point. If the majority of your furniture is fairly plain, invest in one statement piece as an accent. Try a colorful chair, a large, framed painting, or an ornate rug.
  4. Use color to your advantage. Choose the color scheme of a room based on what type of emotion you want the room to convey. For example, use soft, soothing tones to encourage relaxation in a bedroom.
  5. Mix new and vintage pieces. While a room full of thrift store furnishings may look mismatched, using all brand new furniture looks impersonal. Combine the two styles for a designer look.

Top Interior Design Tips for Beginners [Bliss at Home]
Interior Design 101 [Visual.ly]
What are Some Interior Design Tips for Beginners? [Wise Geek]

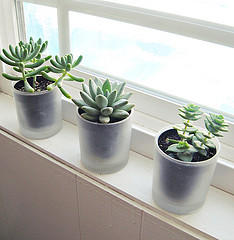
Add a Splash of Green to Your Apartment With These Easy-Care Houseplants

There’s no better way to breathe new life — quite literally! — into your apartment than by adding a few lush, green houseplants to every room. Even if you don’t exactly have a green thumb, these low-maintenance plants will last for years with minimal care.

  1. Pothos. The pothos plant is one of the most common houseplants, and you’ve likely noticed its trailing stems filled with marbled green leaves in many offices and homes. Aside from its beautiful appearance, this plant also requires little light, minimal watering, and even helps to remove toxins from the air.
  2. Aloe. Spiky aloe plants do best in direct sunlight on a windowsill, and because they prefer dry soil, they’re perfect for the forgetful indoor gardener.
  3. Jade. This succulent plant is one of the most interesting in appearance, as it contains thick, rubbery leaves that grow across criss-crossing branches. It also has a very long lifespan of a decade or more.
  4. Snake plant. The snake plant, also known as “mother-in-law’s tongue,” is an affordable alternative to pricey floor plants, as its long, snake-like leaves grow upright in a unique and attractive way. It requires little watering, and it doesn’t mind low sunlight.
  5. Fiddle Leaf Fig. Although it can be a bit finicky, few plants make as much of an impact as the stylish, trendy fiddle fig. If you keep it in bright sunlight it can even grow as high as the ceiling.

24 of the Easiest Houseplants You Can Grow [Better Homes & Gardens]
The 15 easiest indoor house plants that won't die on you. [Today Home]
Easy Houseplants [This Old House]

Cooking 101: How to Sharpen a Kitchen Knife

It may seem strange, but sharpening your kitchen knives is actually one of the best ways to avoid cutting yourself while cooking. A sharp knife means an easier cut with less effort from you, which gives you more control and requires less force. Here are a few tips for sharpening kitchen knives at home.

  1. Place a whetstone, or a rough-surfaced stone made for sharpening knives, on top of a cutting board to offer more stability.
  2. Holding your knife by the handle, place it on a very slight angle against the whetstone (blade facing away, of course).
  3. With moderate pressure, glide the knife forward across the whetstone 10 times. Flip it over and repeat on the other side.
  4. The whetstone has two different types of grit, so flip the whole thing over to the finer side. Repeat the last step to smooth the knife's rough edges.
  5. Finally, hone the blade with a sharpening steel. Place the long, steel rod point-down onto the cutting board, just as you would a nail. Touch the part of the knife closest to the handle against the steel, then pull the blade toward you and slightly downward with a bit of pressure. Repeat this 10 times on each side of the knife, and again any time the knife needs a touch-up.

How to Sharpen a Knife [About Food]
Knife Skills: How to Sharpen a Knife [Serious Eats]
How to Properly Sharpen a Kitchen Knife [Le Cordon Bleu]

How to Make Your Own Spring Floral Arrangement

These fast and easy tips will help you to create a florist-quality spring floral arrangement that you’ll be really proud to display in your home.

  1. Begin with the color palette. If you want to mix and match flowers to create your own bouquet, it’s best to have a color palette in mind. Stick with muted tones, a blend of bold primary hues, or variations of one color to create a cohesive look.
  2. Create a space for each flower. Cheat by creating a sort of grid guideline inside of the vase. Place a piece of chicken wire flat inside of the opening, or even create a crosshatch of durable florist tape across the surface of the vase. The goal is to have a series of 1-inch squares where you can place each type of flower.
  3. Start with the largest flower. Create a base by adding the largest flower (or branch or fern) in the center.
  4. Add the thickest flowers. Arrange thick, heavy flowers around the tallest one in the middle.
  5. Finally, add accent flowers. Add tulips, daffodils, roses or other eye-catching accents last.

DIY Spring Flower Arrangement by Ashley Woodson Bailey [Design Sponge]
How to Make a Cool Flower Arrangement: 8 DIY Ideas for Spring [Stylecaster]
Simple Spring Centerpieces [Better Homes and Gardens]

Must-Read Tips for Becoming a Better Public Speaker

Public speaking is a dreaded task that many people hate, and if you’re faced with speaking in public at work or at school, it can put a great deal of stress on your shoulders. These four smart tips will help you to shake your fear of public speaking—and maybe even become quite skilled at it in the process.

  1. Start from the ending. Though this may seem counterproductive, it’s very important to keep your end goal in mind before speaking in public. How do you want your audience to feel when your speech is over? What is your main idea? Once you decide on these things, it will be much easier to stay focused during your presentation.
  2. Simplify. Don’t use big words or elaborate phrases in your speech in an attempt to sound smarter; it will only make you sound flustered and, most likely, make you more nervous. Deliver concise, clear thoughts using basic language.
  3. Tone down your visuals. If you use PowerPoint or another visual aid in your presentation, keep it minimal. You don’t want to rely on reading off of your slides, and neither does your audience.
  4. Practice, practice, practice. The only real way to prepare for public speaking is to get a bit of experience under your belt. Don’t just read your speech in front of the mirror, give a mock presentation to friends, family or close coworkers. This will help you to shake the nerves once the real thing comes around.

Want to Be a Better Public Speaker? Do What the Pros Do. [Forbes]
Seven Principles of Effective Public Speaking [AMA]
5 Ways to Become a Better Public Speaker [The VAR Guy]
10 Tips to Be a Better Public Speaker [CBS News]

Resume Writing Tips for Job Seekers

Making a good first impression plays a huge role in landing your dream job, and, for most people, that first impression begins with a resume. Here are a few simple tips to help you write a resume that’s equal parts smart, savvy, and interesting.

  1. Make it easy to read. While you want your resume to look aesthetically pleasing (even more so if you’re in a creative profession), it should first and foremost be easy to read. Choose a simple font, place the most important points at the top, and limit your resume to just one page.
  2. Include up-to-date contact information. This one may seem like a no-brainer, but it’s one of the most important parts of the whole resume. Be sure to include your cell phone number, home phone number, email address, and physical address.
  3. Add an objective. Before listing your experience, state an objective that clearly defines your career goals.
  4. Include popular keywords. Consider the increasingly digital state of the job market and treat your resume like any other online content. Include keywords related to your chosen field so that you’ll increase the chance of employers finding it online.
  5. Take it to the streets. Once your resume is complete, don’t be shy about handing out physical copies anywhere and everywhere you go—you never know where your big break will come from.

Top 10 Resume Writing Tips [About Careers]
6 Tips for Writing an Effective Resume [ASME]
Resume Writing Tips [Yale University]

Public Domain/Public Domain

Travel Etiquette Tips Every Jetsetter Should Know

When you’re planning a big trip, you likely think about what to pack, what travel arrangements to make, and which sights to see once you arrive at your destination. But do you ever think about travel etiquette? Proper etiquette on airplanes or buses is something that most people don’t think about until they’re faced with an awkward situation. Avoid uncomfortable run-ins with fellow passengers with these smart tips:

  1. Start in the gate area. At the airport, try to take up as little space as possible in the gate area. Don’t leave bags or other luggage on empty seats, as these places often get very crowded.
  2. Stick with your zone. Although it might be tempting to board your plane early, boarding zones are created for a reason: to keep things running smoothly and efficiently.
  3. Recline kindly. Before you jolt your seat backward and hit another passenger’s knees or jostle his or her computer, simply turn around and ask if it’s okay.
  4. Don’t rush off the plane or bus. Even if you’re in a hurry, it’s important to let the seats ahead of you exit the plane first.
  5. Navigate the airport or subway station like a highway. This means always stay to the right while walking. If you’re on a moving walkway, walkers should stay to the left, standers on the right.

Travel Etiquette Dos and Don'ts [Travel + Leisure]
10 Travel Etiquette Tips [TripIt]
Whose Feet Are Those? Negotiating Air-Travel Etiquette [The New York Times]

How to Host a New Year’s Eve Party Your Guests Won’t Soon Forget

From the sparkling beverages to the twinkling lights, New Year’s Eve parties are some of the most festive (and fun!) of the whole year. Here are a few new ways to help you plan a New Year’s party that your guests will talk about all year long. (Please remember to celebrate responsibly!)

  1. Send out formal invitations. Even if you’re planning a laid-back gathering, sending out snail mail invitations will make things feel much more festive—and avoid confusion about important party details. Include an RSVP if you want to get a head count.
  2. Choose classic decor. Traditional New Year’s Eve decor never gets old, so decorate in shades of black and gold, scatter a few fun party hats and noisemakers around, and be sure that everyone gets his or her own champagne flute.
  3. Keep the food and drink flowing. Prepare more than enough finger foods, fancy hors d’oeuvres and festive desserts, make sure to choose things that everyone will enjoy. Whether you provide the drinks or make your party BYOB, be sure to let guests know in advance.
  4. Make a playlist. One of the most foolproof ways to get people dancing and having a good time is by creating a loud, lively playlist of great music. Then, simply push “play” on your iPod and have a blast!

Throw the Easiest New Year’s Eve Party Ever [Real Simple]
How To… Bring in The New Year [She Knows]
20 Last Minute New Year’s Eve Party Ideas [Ryan Seacrest]

How to Keep Your Furniture Looking Like New

Purchasing furniture is one of the priciest investments that you make in your home, so you likely want to keep it looking as good as new. Follow these smart tips for preventing stains, rips, and other signs of wear and tear on your new furniture.

  1. Invest in high-quality pieces. First and foremost, investing in good quality furniture is one of the very best ways to ensure that it keeps its original look for years to come.
  2. Protect your fabrics and upholstery. When you first purchase a new rug or upholstered sofa, pay a bit extra to have a professional administer a protective coating to repel stains.
  3. Flip sofa cushions. By flipping your sofa cushions monthly, you can distribute the weight from frequent use to multiple parts of the cushion.
  4. Minimize eating in the living room. If you’re already trying to break this bad habit, just imagine a food stain on your brand new sofa for a bit of extra motivation.
  5. Tackle stains immediately. Whether it’s on a rug or the sofa, the most important way to prevent permanent staining is by addressing it immediately so that it can’t sink into the fabric. Read the care instructions on your furniture or rugs when you purchase them so that you know exactly how to remove that red wine stain before it inflicts major damage.

How to Keep Your Furniture Looking Like New [WikiHow]
4 Steps to Keep Your Furniture Looking New [Apartment Therapy]
Keep Your Sofa Looking Like New in 3 Easy Steps! [Shofer’s]

Tips for Properly Cleaning Your Wooden Cutting Boards

If you’ve ever owned a wooden cutting board, you know just how finicky they can be. These kitchen essentials are ideal for chopping vegetables or serving a cheese platter, but they’re also very difficult to clean. Here are four smart tips to help you properly clean your cutting board.

  1. Use vinegar as a disinfectant. Using soap and water on your cutting board can cause it to weaken or crack. Instead, disinfect it with a full-strength white vinegar after each use to kill E coli, salmonella, and other dangerous bacteria.
  2. Remove odor with lemons. Rub your cutting board all over with the cut side of half a lemon in order to remove the odors left behind by onions, meat, or crushed garlic.
  3. Deep clean with baking soda. Every so often, deep clean your cutting board with baking soda to ensure that no bacteria is lurking beneath the surface. Scrub it with a paste made of one tablespoon each of baking soda, water, and salt.
  4. Remove stains with salt. If your cutting board is covered in oil stains, remove them by sprinkling each stain with coarse salt and scrubbing with a sponge dipped in hot water. Repeat as needed until the stain is completely gone.

How to Clean a Cutting Board: 7 Effective Treatments [Reader’s Digest]
5 Ways to Clean a Wooden Cutting Board [Food Network]
How to Clean a Wooden Cutting Board [Paula Deen]
Clean Wooden Cutting Boards Naturally with Lemon and Salt [The Kitchn]

Pin It on Pinterest