Ice Cream Cones Have a New Purpose in These Fun Recipes

Although you’ve probably only used ice cream cones for, well, ice cream, the recipe possibilities are truly endless for this sweet, crunchy treat—if you think creatively. Here are three completely unique spins on the classic ice cream cone.

Apple Snack Mix [tasteofhome.com]
This fun snack mix makes a wonderful kids’ party favor at birthday parties or bonfires. Cinnamon flavored cereal, roasted peanuts, sunflower kernels, apple chips, and a number of other hearty ingredients mix together to create a crunchy snack mix that looks adorable served in a sweet waffle cone.

Mini Ice Cream Cone Cupcakes [kraftrecipes.com]
Even if you aren’t serving ice cream in your ice cream cone, you can still emulate the cute look of the beloved summertime sweet. These creative cupcakes are baked into mini ice cream cones and then topped with a swirl of icing that looks just like soft serve.

Popcorn Ball Ice Cream Cones [cookiesandcups.com]
If you prefer the crunch of popcorn to the icy chill of ice cream, you’ll love this fun snack. By mixing the popcorn with marshmallows and chocolate candies, you can create a uniquely sweet treat that looks just like vanilla ice cream. Serve it on top of a classic sugar cone to make it even more authentic!
Love to Cook? Master These Must-Know Knife Techniques

If you love to cook, you know how important it is to use the proper cutting techniques in every recipe. Many people don't know the proper names of these techniques, however, which often leads to using the wrong one. Here are three important types of cutting that are essential for everything from entrees to desserts.

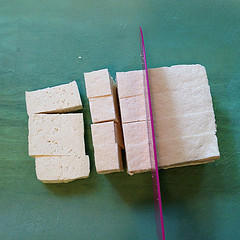
  1. Julienne. To julienne, you want to cut vegetables or other food items into stick-shaped pieces that are long and thin. Start by cutting the item into a square, then slice it into rectangular-shaped pieces lengthwise. Repeat the same step on each of the rectangles until you're left with pieces that resemble matchsticks.
  2. Chiffonade. This type of cut sounds fancy, but it actually just refers to cutting herbs or thin leaf vegetables. Roll the herbs up into a tight tube, then roughly chop across with a sharp knife. It doesn't matter how the cuts look, just that the pieces are small enough to sprinkle throughout a dish.
  3. Dice. Dicing is similar to chopping, but it creates entirely uniform pieces for dishes like stews or fruit salads. Begin with a rectangular shape and continue to cut it both directions until you're left with uniform pieces in the size that you desire.

Knife Skills: Different Types of Cuts [The Culinary Cook]
Top 10 Knife Skills [How Stuff Works]
Perfect Your Knife Skills With This Chef's Guide to Knives [Lifehacker]

Love Home Canning? Read These Food Safety Tips!

Home canning is a delicious food trend that’s seen quite a comeback in recent years, and it makes a great way to use up fresh produce before it has a chance to spoil. Here are a few safety tips that will help you to can your fruits and veggies safely.

  1. Be aware of the safety hazards. Many first-time home canners don’t realize that there are deadly food poisonings associated with incorrect canning methods. Botulism is the most common one, and it comes from a bacteria found in soil that produces a toxin when sealed in a jar. Luckily, there are preventative measures to kill these bacteria before canning.
  2. Throw out your old canning recipes. Those old family canning techniques are likely a botulism risk waiting to happen. Keep up with the latest techniques to keep yourself and your family safe.
  3. Don’t stray from the recipe. Canning recipes aren’t just created to preserve the taste of your foods; they’re also meant to protect you against illness. Resist the urge to add extra herbs or a pinch more sugar, as this can threaten the pH levels in your jar.
  4. Use a pressure canner. In recent years, it’s become apparent that the only way to stay completely safe while canning meats or low-acid vegetables is by using a pressure canner. This heats the food to 240 degrees Fahrenheit, a temperature that can only be reached in a pressure canner.

Don’t Botch It: Home Canning Safety Tips [Home Food Safety]
Home Canning: Keep Your Family Safe! [FoodSafety.gov]
Home Canning and Botulism [CDC]
Safety Tips for Home Canning [About.com]

Cereal Is the Secret Ingredient in These Fun Recipes

If you think that cereal is only meant for breakfast, you’re really missing out! There are many ways to crush, bake, and blend cereal into creative dishes that you would never expect. Check out these three unique recipes that use cereal as a main ingredient.

BBQ Pork Sticks [kelloggs.com]
By blending Kellogg’s Special K cereal with mesquite seasoning and barbecue sauce, you can create a crunchy, spicy coating for baked pork strips. Best of all, the low-calorie cereal is a much healthier alternative to the usual heavy breading.

Refrigerator S’mores Mini Cakes [bettycrocker.com]
The sweet combination of Golden Grahams and Cocoa Puffs cereals blends with marshmallows and chocolate chips to imitate the flavor of everyone’s favorite campfire treat. They also don’t require any baking, which makes this recipe even easier than most.

Apple Cinnamon Cheerios Pancakes [cheerios.com]
Skip the milk and spoon and eat cereal for breakfast in a new and exciting way. This recipe uses Apple Cinnamon Cheerios to make fluffy pancakes that taste delicious when topped with maple syrup.

Party Safe: Tips for Serving a Safe Food Buffet

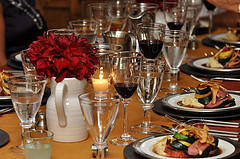
When you have a large group of people over for dinner, serving food buffet-style ensures that everyone gets exactly what they want. But how can you be sure that everything stays fresh, from appetizers to dessert? Here are a few tips for serving a safe food buffet.

  1. Buy foods at the proper temperature. Things like fried chicken, casseroles, and ice cream should be kept at the same temperature from the store to the buffet table, as changing their temperatures too much can cause food to spoil.
  2. Know the proper temperatures. Hot food should be kept between 140° and 165° Fahrenheit, while cold food should be kept at 40° Fahrenheit and lower.
  3. Don’t leave food out for longer than two hours. Be sure to include preparation and serving in your count.
  4. Use the proper tools. To ensure that food is kept at the proper temperature, use things like slow cookers, warming trays, and nesting dishes in bowls of ice. To prevent guests from mixing foods, make sure that you provide a separate spoon, spatula, or tongs in each dish. Also provide individual bowls for dips to discourage guests from double-dipping.

Serving Up Safe Buffets [FDA]
Serving Prepared Foods Safely [Whole Foods]
Holiday or Party Buffets [USDA]

Play It Safe: 5 Steps for Handling Eggs

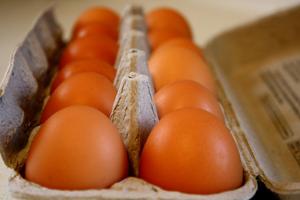
You parents have probably warned you about food-borne illness since you were just a child, but how much do you really know about handling raw eggs? These simple steps will teach you how to safely prepare and serve eggs.

  1. Purchase eggs in good quality. Only buy eggs from a refrigerated case, and open the carton to make sure that none of the eggs are cracked. Refrigerate them as soon as you get home.
  2. Know their expiration date. As a general rule, eggs are only good for about three weeks. After that, you should throw them out and buy a new carton.
  3. Cook thoroughly. When cooking eggs, make sure that there are no runny parts before serving. Things like casseroles and baked goods should be cooked to at least 160° Fahrenheit to ensure that the eggs inside are safe to eat.
  4. Serve properly. All foods containing eggs should be eaten immediately after cooking. To serve a large party buffet-style, keep hot dishes hot by using a slow cooker or heated serving pan.
  5. Store safely. If you must refrigerate a dish with eggs, be sure to use it within three to four days and reheat to at least 160° before serving.

Playing It Safe with Eggs [FDA]
Eggs & Food Safety [Incredible!]
Tips to Reduce Your Risk of Salmonella from Eggs [CDC]

Public Domain/Photos-public-domain

Learn to Cook Right from Your Phone with These 3 Apps

When you’re making something in the kitchen you need your recipe to be easily accessible, and there’s nothing more convenient than your smartphone. These helpful cooking apps will give you recipes, cooking techniques, and other necessary information right from your mobile device:

How to Cook Everything: Cooking Basics
This app, developed by New York Times cooking columnist Mark Bittman, includes an assortment of recipes and high-quality photos, video and audio to make your time in the kitchen easier and more hands-on. The recipes are simple and straightforward, and if you come across a technique that you don’t understand it even includes links to video tutorials to help you learn as you go.

Epicurious
The popular cooking website now has a helpful app for iPhone, iPad, Android, Nook, Windows and Kindle. The Epicurious app provides users with numerous recipes, and it has a printing feature that allows you to print your favorite recipes from anywhere. The shopping list feature even creates lists of ingredients that you can easily access at the grocery store.

Mastering the Art of French Cooking: Selected Recipes
The famous Julia Child book "Mastering the Art of French Cooking" is now available from your mobile device with this innovative app.  With real photos straight from the book, Child’s most beloved quotes, and even video tutorials for mastering some of her more complex dishes, this app is ideal for anyone who wants to learn the art of French cooking.

The 5 Kitchen Tools You Didn’t Know You Needed

Like preparing bread only to realize halfway through that you're out of yeast, nothing derails a cooking session faster than an inadequate arsenal of cooking tools. In many cases, a tool's importance is only realized when you reach for it and it's not there, so be sure to equip your kitchen before you start that recipe! Here are five multi-tasking kitchen gadgets you didn't know you needed — until now.

1. Microplane Zester: A super-sharp stainless steel zester makes zesting citrus and grating parmesan a breeze — much simpler than fumbling with a four-sided box grater.

2. Mortar and Pestle: From muddling mint for a cocktail to crushing dried herbs and spices, a mortar and pestle helps impart serious flavor to whatever you're preparing. Splurge for a marble pestle; they're more durable than stone or wood models.

3. Immersion Blender: An immersion blender is an affordable, portable tool for blending just about anything at warp speed, from soups and baby food purees to whipped cream and salad dressing.

4. Handheld Citrus Press: Forget those clunky citrus juicers that just eat up counter space; purchase a handheld citrus press that can be easily stored away in a drawer. To save even more space, purchase a press sized for a lemon, and buy an insert to accommodate a lime — without buying a second tool.

5. Tofu Press: Even if you're not a vegetarian, a tofu press can be used to press water out of frozen vegetables, homemade cheeses — anything you need to be liquid-free.

Want to learn about another multi-tasking wonder? Visit The Kitchn to see "the Number 1 Multi-Tasking Gadget You Should Have In Your Kitchen." [The Kitchn]

Pin It on Pinterest